Springs in Tokamak, neRigidBodyController
Springs in Tokamak?
Tokamak itsself doesn't provide a class for springs. But as they are a very interesting and useful element in physics simulations
I have tried to create such a class. It works quite well but I am not yet completely satisfied with it. If you want to help
to improve it, please
e-mail me. We could make it to a Tokamak Community Spring class!
A theoretical spring is quite simple: It is an object with no mass and which does not collide with objects. It connects two
bodies, either rigid-rigid or rigid-animated. Therefore is applies a force on the rigid objects in the direction of the spring itsself.
The strength of the force is dependent of the extension of the spring. It has a default length at which there is no force.
If the spring is contracted or extended, there will be a force.
This concept is quite nice and easy to implement. But if you image a real steel spring, fixed on a solid body and try to
simulate this with a spring described above you will soon be disappointed - and so was I. As the spring is not fixed it will
turn away:


In the first image the blue line represents a "fixed" spring, the angle between the bodies and the spring remains at 90°.
In the second image there is the same spring connecting the bodies, but after a short time, the upper body gets a little sidewards
movement and falls down - the spring is at default length and thus not applying any force.
So what to do? I added a "fixation" to my springs which creates torques and tangential forces. But they are not yet completely
correct implemented, if the spring is fixed at a point different from the center. But in most cases it works quite well.
Some sample with CTokSpring
The spring class can be used in multiple ways and so I thought I'd include several samples.
By pressing "i","o","k" you can apply an impulse left, right or upwards (in samples 1 and 2 on the small box, in the other examples
on the upper flat box). By pressing "p" you can let fall some spheres down. This way you can watch the behavior of the springs better!
SpringSimulation1.exe
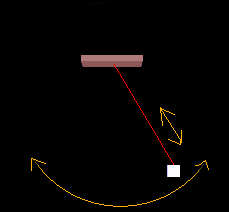
This first example shows an unfixed spring betweeen an animated and a rigid body.
SpringSimulation2.exe
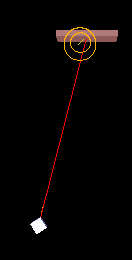
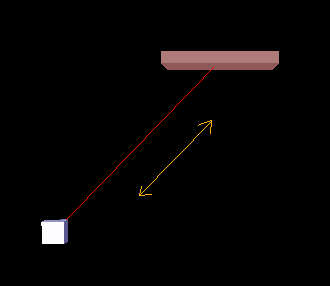
The second example shows the same spring - but fixed at both bodies. This is shown by the short yellow line which points in
fixation direction. This line is highlighted in the first picture. After the rigid body has been moved to the fixation direction
it only swings in this direction. By the way, the spring is also fixed at the rigid body (small box), but it turns quite fast
to get the
right orientation, so you cannot see the yellow line anymore, it's behind the red one.
SpringSimulation3.exe

Here you can see two flat boxes connected via a fixed spring. This must be quite a "strong" spring to keep the bodies in
this position.
SpringSimulation4.exe
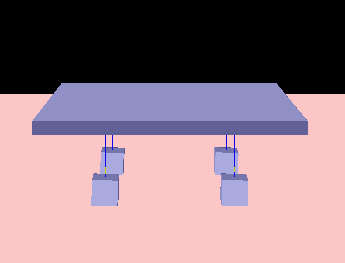
Here, for the first time, you can see an example with more than one spring. The flat box has four boxes below it
- each connected via a spring.
SpringSimulation5.exe
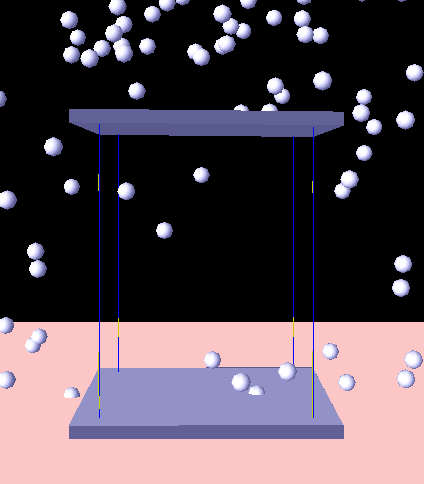
Of course you can also connect two flat boxes with more than one spring!
Using my CTokSpring class
Before I will explain how the spring class works, I will tell you how you can use it. If this is enough for you, you do not
have to read on after this section (but you can also learn how controllers work!).
So let's first look at the first sample. I have created two boxes (animBox, smallBox). Now we need this code to create a spring:
	//Create a spring connecting the smallbox with the fixed box:
	CTokSpring * spring = this->CreateSpring(smallBox,animBox);
	//set the default length, spring const, damping factor:
	spring->SetDefaultLength(5.0f);
	spring->SetSpringConst(1.0/40.0f);
	spring->SetDampingFactor(0.0001f);
	//Set the Connection Position at the small box
	//(relative to the body's center)
	//(the connection position of the animBox remains at 0,0,0)
	neV3 ConnPos;
	ConnPos.Set(0.0f,0.5f,0.0f);
	spring->SetConnPos1(ConnPos);
What's happening? First we call the CreateSpring() function of CTokSim (thus it knows about the spring and can display it).
The next three lines define the attributes of this simple, unfixed spring:
- The default length is the length where no force is applied. The spring will remain in this length if it reaches it
(and if it has no velocity then)
- The spring constant defines, how "strong" the spring is - it also effects the frequency of the oscillation
- The damping factor - here very small - is similar to the damping of joints. It is often useful to "calm down" your simulation.
By default, a spring is connected at the bodies' center. If you want to connect the spring at the surface, you have to call
SetConnPos1/2(). This is done here to connect the spring at the smallBox' surface (smallBox is "body 1", because it was passed first).
This is all you need for an unfixed spring.
Let's continue to fix the spring. The code of sample 3 is
	spring = this->CreateSpring(m_Rigid[m_RigidCount-1],m_Rigid[m_RigidCount-2]);
	spring->SetDefaultLength(15.0f);
	spring->SetSpringConst(1.0f);

	pos.Set(0.0f,-0.5f,0.0f);
	spring->SetConnPos2(pos);
	pos[1] = 0.5f;
	spring->SetConnPos1(pos);

	spring->SetDampingFactor(0.01f);

	neV3 up;up.Set(0.0f,1.0f,0.0f);
	SFixationInfo fixInfo;
	fixInfo.bFixed1 = true;
	fixInfo.bFixed2 = true;
	fixInfo.ConnDir1 = up;
	fixInfo.ConnDir2 = -up;

	fixInfo.fTangentDamping = 1.5f;
	fixInfo.fTangentForceFactor = 15.0f;
	fixInfo.fTorqueFactor = 500.0f;
	fixInfo.fAngularDamping = 10.0f;
	spring->FixSpring(fixInfo);
The first three lines are well known to you and so are the next four lines. The damping factor is a bit higher now.
And now starts the interesting stuff. "SFixationInfo" is a struct type which contains all information required for fixing
the spring.
First we set the bFixed values both to true. Then we set the connection directions - relative to each body's coordinate system.
As soon as the spring is fixed, there will be torques and tangential forces created. Their strength (fTangentForceFactor and fTorque Factor)
defines, how fast the spring moves the objects so that they are in the desired position relative to each other.
These torques and forces must be damped, otherwise you will get another strong oscillation. Therefore you can set the fTangentDamping
and fAngularDamping. To get these values is a bit tricky, don't choose them to high, if your accuracy (->Advance()/CalculateNextFrame())
is not high enough. But if you have found them, things work quite nice.
Now the struct's values have been set - we can fix the spring by FixSpring().
This is all. The other samples can be created with this knowledge! Have fun using the springs!
How does CTokSpring work?
A spring creates a force on both bodies which it connects (if one is animated, this second force is not considered). So CTokSpring
is inherited from neRigidBodyControllerCallback and defines the function
void CTokSpring::RigidBodyControllerCallback(neRigidBodyController * controller, float timeStep)
which is something like the heart of CTokSpring. This callback function is registered as a controller for both bodies in the
constructor of CTokSpring (if both are rigid). As second parameter the timestep is 0.0f - which means that the callback is called
each time when "Advance()" is called. (A timestep smaller than the one passed to Advance is not possible or has no effect.)
In this callback function the spring applies its force/torque on the body. All other functions are simple helper functions.
So how does RigidBodyControllerCallback() compute the forces?
First it initializes some values:
	//Get a pointer to the rigid body we will controll here:
	neRigidBody * rigid = controller->GetRigidBody();
	//This method will calculate a force at the connection point, a "center force" and a torque:
	neV3 forceAtConnPos,centerforce,torque;
	forceAtConnPos.SetZero();
	torque.SetZero();
	centerforce.SetZero();
Then it grabs all information about the two bodies connected with the spring:
	//first get the properties of body1 and body2:
	BodyProperties Body1, Body2;
	Body1.Position = m_Rigid1->GetPos();
	Body1.ConnPos.Set(Body1.Position);
	Body1.ConnPos+= m_Rigid1->GetRotationM3()*m_ConnPos1;
	Body1.Velocity = m_Rigid1->GetVelocity();
	Body1.AngularVelocity = m_Rigid1->GetAngularVelocity();
	Body1.ConnDir = m_Rigid1->GetRotationM3()*m_Fixation.ConnDir1;
	Body1.bSpringFixed = m_Fixation.bFixed1;

	if (m_Type == RIGID_TO_RIGID)
	{
		Body2.Position = m_Rigid2->GetPos();
		Body2.ConnPos.Set(Body2.Position);
		Body2.ConnPos += m_Rigid2->GetRotationM3()*m_ConnPos2;
		Body2.Velocity = m_Rigid2->GetVelocity();
		Body2.AngularVelocity = m_Rigid2->GetAngularVelocity();
		Body2.ConnDir = m_Rigid2->GetRotationM3()*m_Fixation.ConnDir2;
	} else
	if (m_Type == RIGID_TO_ANIM)
	{
		Body2.Position = m_Anim->GetPos();
		Body2.ConnPos = Body2.Position;
		Body2.ConnPos += m_Anim->GetRotationM3()*m_ConnPos2;
		Body2.Velocity.SetZero(); //this might be wrong if the user moves his anim body.
						//but this case is not yet supported here.
		Body2.AngularVelocity.SetZero();
		Body2.ConnDir = m_Anim->GetRotationM3()*m_Fixation.ConnDir2;

	}
	Body2.bSpringFixed = m_Fixation.bFixed2;
As this callback can be called either for body1 or body2 it has to find out which one is the case at this moment and
assign the right values:
	//Assign the "ThisBody" and "OtherBody" structures:
	if (rigid == m_Rigid1)
	{
		ThisBody = Body1;
		OtherBody = Body2;
	}
	else
	{
		ThisBody = Body2;
		OtherBody = Body1;
	}
Now find out the state of the spring: The distance vector between the connection points, its direction and its length:
	neV3 dist = OtherBody.ConnPos-ThisBody.ConnPos;
	neV3 dir = dist;dir.Normalize();
	//how long is the spring right now?
	f32 SpringLength = dist.Length();
After doing this you can easily calculate the spring force:
	//Ready to calculate the force in the direction of the spring ("contraction/expansion force"):
	forceAtConnPos -= (m_Length-SpringLength)*m_SpringConst*dir;
(forceAtConnPos has been initializes to 0 before, so the "-=" is equivalent to "=-"). The "-" must be set because the
force is directed towards the body we are controlling here.
This would be all - for the most simple spring you can imagine: unfixed and not damped.
Let's add damping first. This is easy - if the spring is unfixed:
forceAtConnPos -= m_DampingFactor*(ThisBody.Velocity-OtherBody.Velocity);
This simply takes the difference of the velocities of the bodies and creates a force against the velocity - multiplied with
the damping factor.
What if the spring is fixed? Then the m_DampingFactor is only valid for movement in spring direction. The movement orthogonal
to it is handled with the fixation damping factor (which is probably much stronger).
So the complete damping is done by
	//Add a damping force
	//only calculate in the direction of the spring if fixed:
	if ((m_Fixation.bFixed1) || (m_Fixation.bFixed2))
		forceAtConnPos -= m_DampingFactor*(ThisBody.Velocity-OtherBody.Velocity).Dot(dir)*dir;
	else
		forceAtConnPos -= m_DampingFactor*(ThisBody.Velocity-OtherBody.Velocity);
The line which handles the damping for fixed springs uses a projection of the velocity difference on "dir" (the spring direction).
So now comes the hard part - fixation:
This is the code which creates a torque which keeps the right angle between the body and the spring - including damping:
	if (ThisBody.bSpringFixed)
	{
		//fixation at this body will cause a torque

		torque += ThisBody.ConnDir.Cross(dir)*m_Fixation.fTorqueFactor;
		//damping torque:
		torque -= m_Fixation.fAngularDamping*(ThisBody.AngularVelocity-OtherBody.AngularVelocity);

	}
If the spring is fixed at the other body, this body will be moved so that it is located in connection direction:
	if (OtherBody.bSpringFixed)
	{
		 //Fixation of the spring on the other body causes a force:

		neV3 planeNormal = OtherBody.ConnDir.Cross(dir);
		centerforce -= m_Fixation.fTangentForceFactor*planeNormal.Cross(dir);
		//damping force direction:
	    dampforcedir = centerforce;dampforcedir.Normalize();

	}
The same if the spring is fixed at this body:
	if (ThisBody.bSpringFixed)
	{
		 //Fixation of the spring on this body causes also a force:

		neV3 planeNormal = ThisBody.ConnDir.Cross(dir);
		centerforce += m_Fixation.fTangentForceFactor*planeNormal.Cross(dir);
		//damping force:
		dampforcedir = centerforce;dampforcedir.Normalize();
	}
This is all nice - but applying the forces and torques was the problem I got. If you set a force at a point different from
the center it produces a torque. Calling SetTorque() overwrites the other torque and vice versa.
I used these lines, which are a working approximation:
	if (m_Fixation.bFixed1 || m_Fixation.bFixed2)
	{
		rigid->SetForce(forceAtConnPos+centerforce,ThisBody.ConnPos);
		rigid->SetTorque(torque);
	}
	else
	{
		rigid->SetForce(forceAtConnPos,ThisBody.ConnPos);
	}
If you can improve them, please contact me!
**************************************************************************
Any comments? Conact me!
philipp.crocoll@web.de
www.codecolony.de


